
Introduction to Crochet: a Complete Guide of The Basics
There’s something deeply comforting about crochet. The quiet rhythm of yarn sliding through your fingers, the soft pull of each stitch, the way a simple thread slowly becomes fabric. Whether you’re here out of curiosity or you’ve been dreaming of learning for a while, this is your invitation to begin.
Crochet can feel super difficult at first, but with patience, is accessible, portable, and wonderfully meditative. With just a hook and some yarn, you can create garments, blankets, bags, home decor, and small heirlooms filled with intention. And the best part? You only need to learn a few basic stitches to get started.
In this guide, I’ll walk you through the foundations, and you’ll find a stitch chart and diagrams below to help you visualize everything clearly.
Recommended Materials (Beginner-Friendly)
Below are materials I genuinely recommend for starting out. You can add your affiliate links here.
1. Crochet Hooks
If you are new to crochet, I recommend getting this case that includes hooks of all sizes.
2. Recommended Yarn for Beginners
Medium weight yarn (Worsted / Category 4)
Smooth texture (avoid fluffy or textured yarn at first)
Light or neutral color (easier to see stitches)
Cotton or acrylic are both good beginner options. Cotton gives structure; acrylic is soft and forgiving.
3. Stitch Markers
Helpful for marking the first stitch of each row or round
Prevents accidental increases or decreases
You can buy them here: 150 Crochet Markers
4. Small Scissors
Any sharp, small pair for clean yarn cuts. I have these ones.
6. Measuring Tape
Useful when you begin following patterns or making garments.
5. Yarn Needle (Tapestry Needle)
You will need them for weaving in ends and finishing your projects neatly.
You can find this and the measuring tape included in the first crochet case I shared.
Some links in this description are affiliate links, which means I may receive a small commission (at no extra cost to you) if you make a purchase. Thanks for supporting my channel so I can continue sharing free resources and content!
The Basic Crochet Stitches
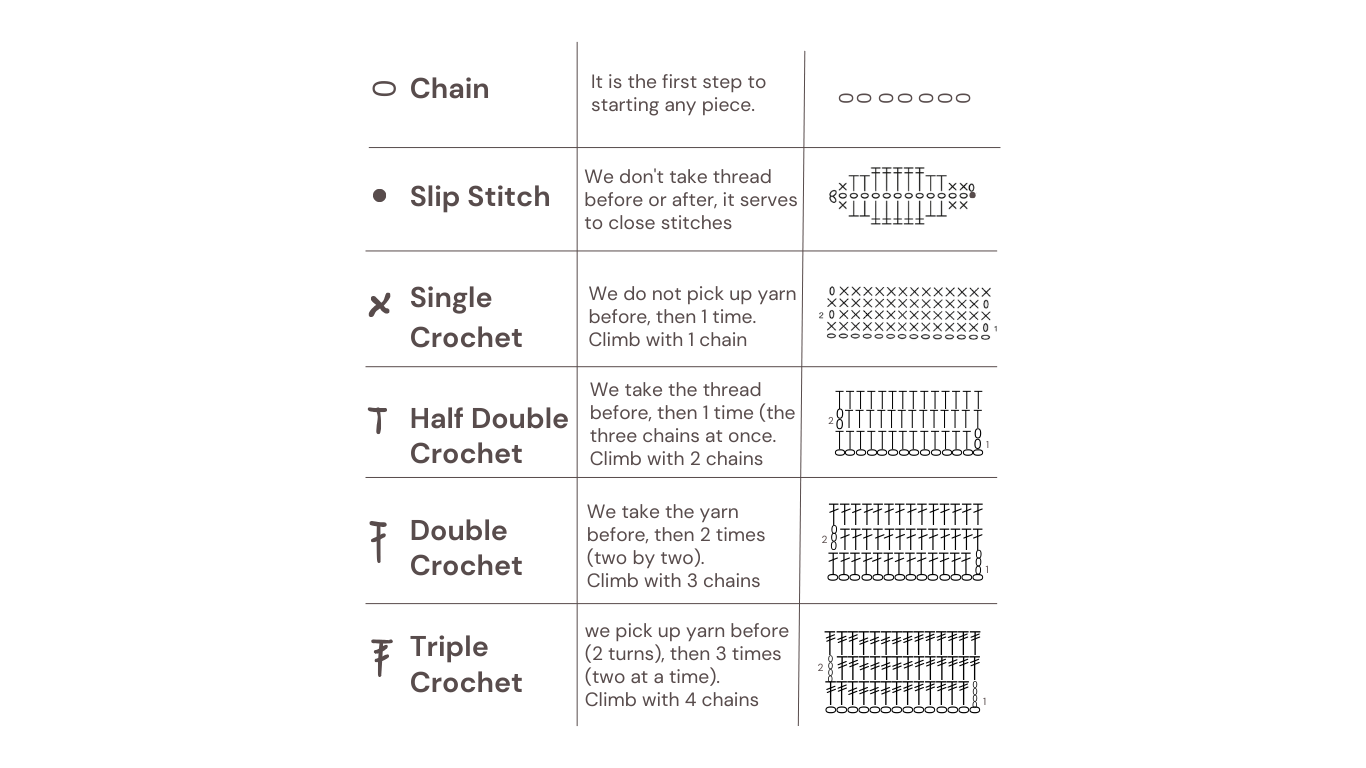
Below, you’ll find a stitch chart and diagram explanations to guide you visually. These are the essential stitches every beginner should learn:
Understanding Crochet Charts & Diagrams
Crochet diagrams use symbols instead of written instructions. They may look intimidating at first, but they’re incredibly helpful once you get used to them.
Here’s how to approach them:
Each symbol represents a specific stitch.
The chart shows where each stitch is placed.
You usually read charts from the bottom up (for rows) or from the center outward (for rounds).
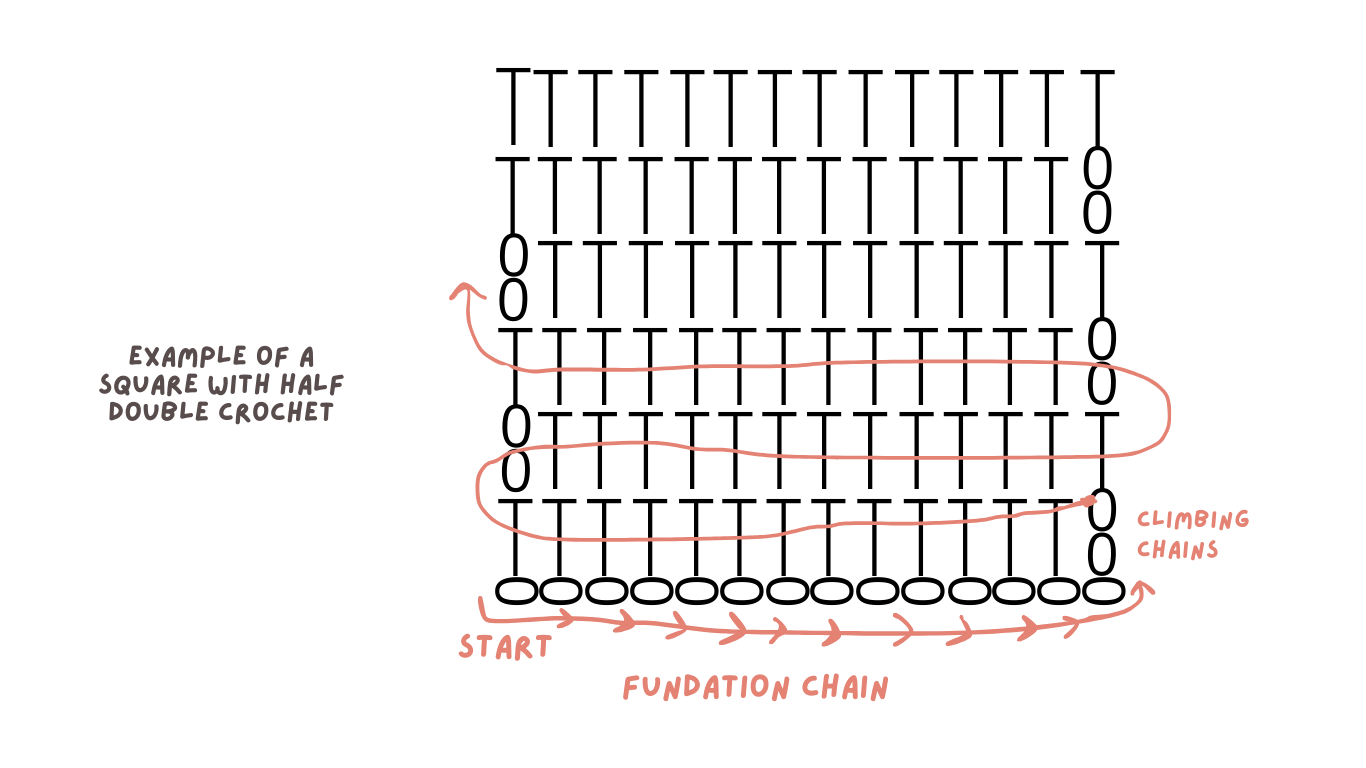
If you’re a visual learner, charts can be much easier to follow than written patterns. I recommend comparing the chart to the written instructions as you practice — this builds confidence quickly.
How to Make Increases and Decreases
Once you’re comfortable with the basic stitches, the next step is learning how to shape your crochet. That’s where increases and decreases come in.
They allow you to:
Shape garments
Create curves (like sleeves or necklines)
Make 3D objects (amigurumi, baskets, hats)
Adjust sizing
And the good news? They’re much simpler than they sound.
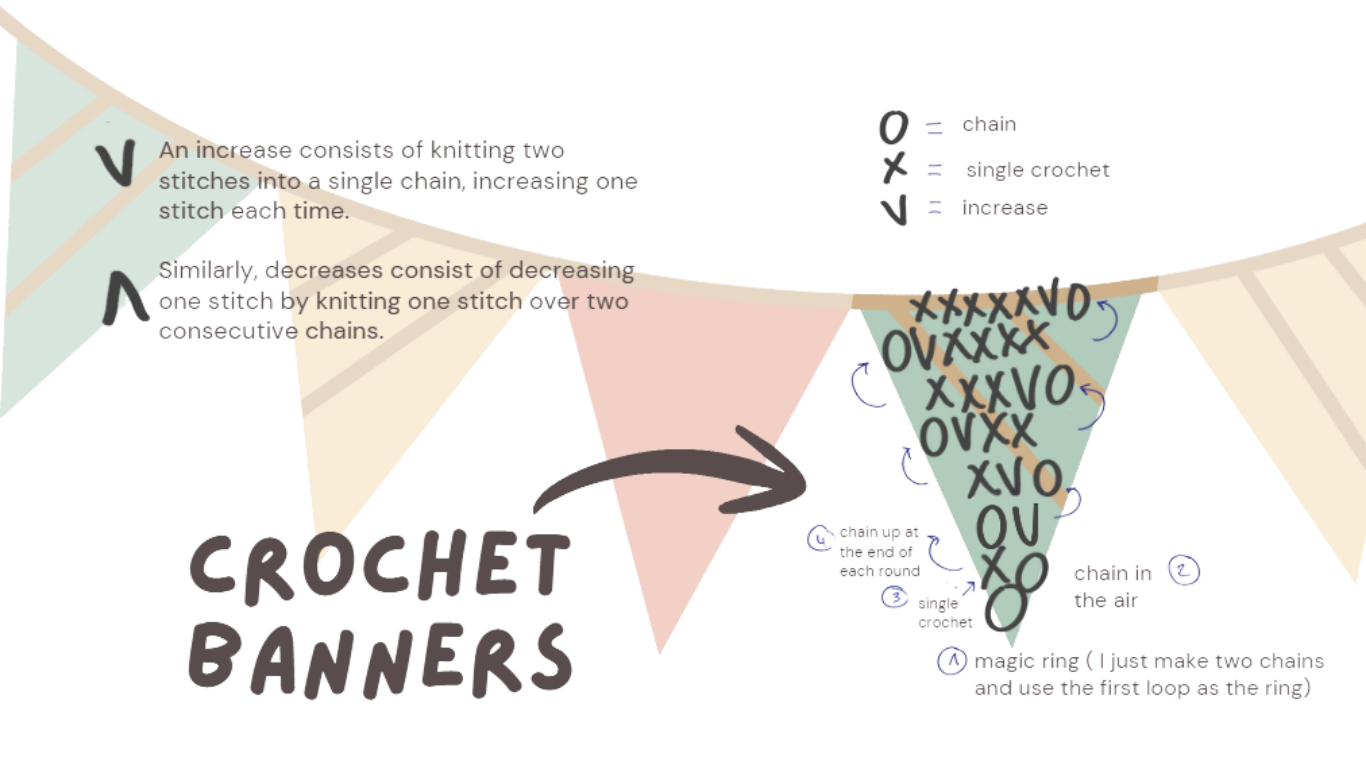
What Is an Increase?
An increase means adding stitches to make your piece wider.
You do this by working two stitches into the same stitch.
For example, with single crochet:
Insert your hook into the stitch
Complete one single crochet (or the stitch you are using)
Insert your hook back into the same stitch
Complete another single crochet
You’ve just made an increase.
In patterns, you might see:
“inc”
“2 sc in next st”
“sc increase”
The stitch count will go up by one each time you increase.
In rows, increases usually happen at the beginning or end of a row.
In rounds, they are spaced evenly to keep the shape flat.
What Is a Decrease?
A decrease means reducing stitches to make your piece narrower.
In single crochet, this is often called sc2tog (single crochet two together).
Here’s how:
Insert your hook into the next stitch, yarn over, pull up a loop (don’t finish the stitch).
Insert your hook into the following stitch, yarn over, pull up a loop.
Yarn over and pull through all loops on the hook.
You’ve turned two stitches into one.
In patterns, decreases may be written as:
“dec”
“sc2tog”
“dc2tog” (for double crochet decreases)
Your stitch count will go down by one each time.
*Invisible Decrease (Optional but Helpful)*
If you’re making amigurumi or want a neater finish, you can use an invisible decrease (especially in single crochet).
Instead of inserting your hook through both loops of each stitch, insert it through the front loops only of the next two stitches, then complete the decrease.
This makes the fabric look smoother and less bulky.
This can be your first project to test increases:
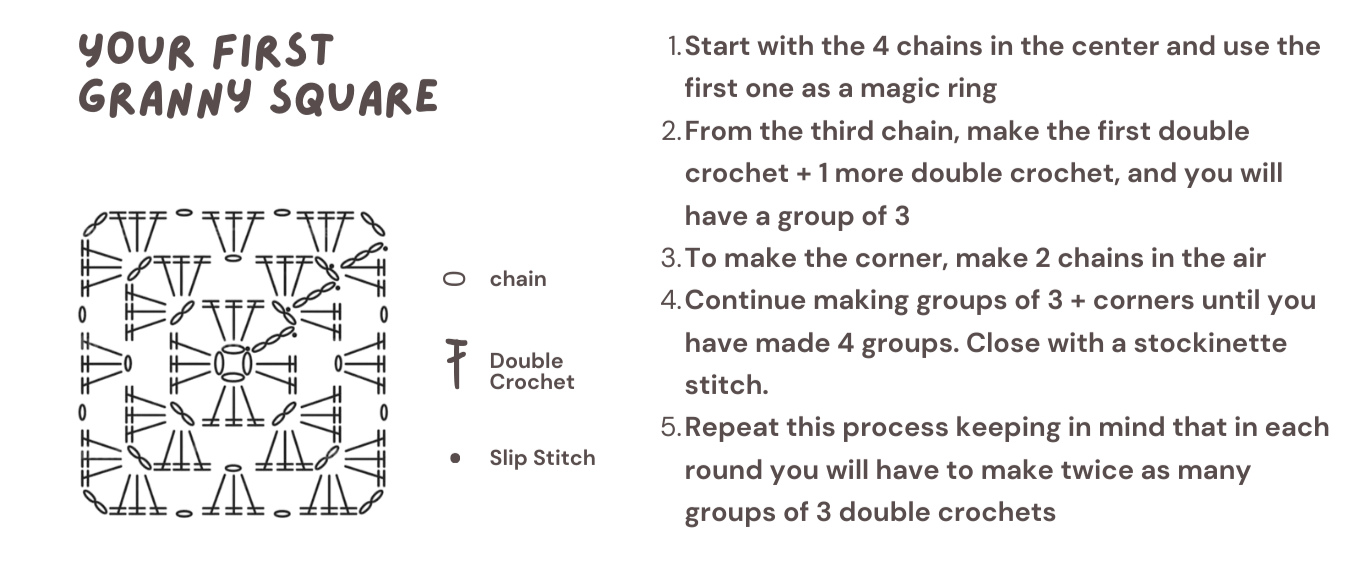
Your First Project: The Granny Square
Few things feel as satisfying as completing your first granny square. It’s simple, repetitive, and teaches you how to work in the round.
The traditional granny square is made primarily with double crochet stitches and chains. You begin with a small center ring and build outward in rounds, creating clusters separated by chain spaces.
Why start with granny squares?
They teach working in the round.
They’re forgiving and easy to adjust.
They can be joined into blankets, bags, cushion covers, or garments.
They’re perfect for using leftover yarn.
Start with a classic solid granny square. Once you’re comfortable, try experimenting with color changes or textured variations.
And don’t worry if your first square isn’t perfectly flat — that’s part of learning. Blocking can help even things out later.
Your first stitches may feel uncertain. Your first granny square might twist or wave. That’s okay. Every experienced crocheter once made their very first chain.
Let this be your beginning.
And once you’ve made your first square, you’ll never look at a simple ball of yarn the same way again.
When you are ready, here’s how I can inspire you in your crochet journey:
In this playlist, I'll be sharing my beginner crochet projects, with all the ups and downs of learning a new craft. Whether you're just starting out or looking for some inspiration, let's explore the world of crochet together! :)