
DIY Patchwork Pincushion Tutorial (With Magnet)
Some of you have noticed the pincushion I use in my sewing videos and asked for a tutorial, and I’m very happy to share it with you.
This is a simple patchwork project that can be sewn by hand or with a sewing machine, and it’s a great way to use up small fabric scraps.
Materials
You will need 4 different fabrics (2 plain and 2 patterned works beautifully):
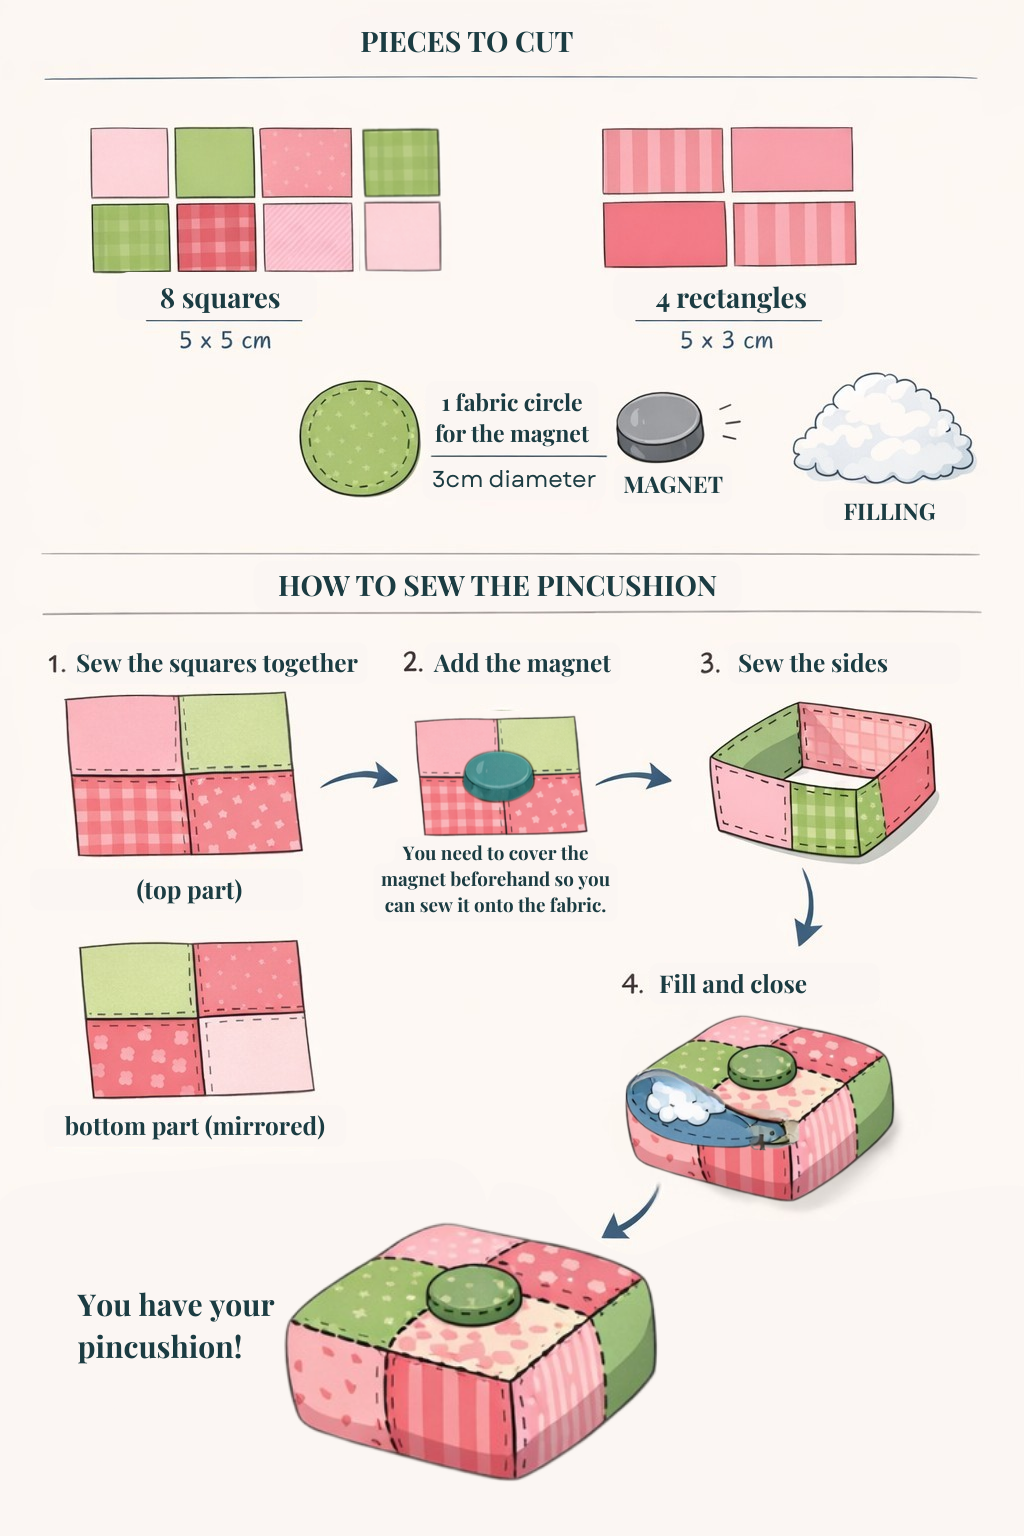
8 fabric squares: 5x5 cm + 0,5 seam allowance // inches: 2x2" + 0,20" seam allowance
4 fabric rectangles (for the sides): 5x10 cm + 0,5 seam allowance // inches: 2x4" + 0,20" seam allowance
1 small magnet
A small piece of contrasting fabric for the magnet
Pillow stuffing or small fabric scraps for filling
Needle and thread
Pins
Iron (recommended)
Pattern paper or tracing paper

Preparing the Pattern
Before cutting your fabric, I recommend transferring the pattern to tracing paper.
One trick that helps a lot when sewing is to make small holes at the corners of the seam allowance in your paper pattern. When transferring the pattern to the fabric, these holes allow you to mark the seam allowance directly.
It might sound like an extra step, but trust me — it makes sewing much easier and helps keep your seams straight and consistent.
Once you finish cutting the fabric, you should have:
8 squares
4 rectangles
Before sewing anything, unfold your squares and arrange them on your table to decide how you want the patchwork to look.
If you want a design similar to mine, choose four fabrics in a similar color palette — for example two plain fabrics and two with floral or decorative motifs.
The top and bottom of the pincushion use the same patchwork layout, but the bottom piece should be mirrored so the seams align nicely later.
Sewing the Patchwork Squares
Start by placing two squares right sides together.
Pin them carefully so the corners match, then begin sewing.
If sewing by hand:
Secure the thread with three small stitches in the same spot.
Sew along the seam allowance using small stitches.
Finish with three stitches again to secure the thread.
The seam allowance markings you made earlier help a lot here — you always know exactly where to start and stop.
Repeat this to create two pairs of squares.
Before joining the pairs together, I highly recommend ironing the seams flat. This makes the final patchwork much neater.
Now place the two pairs right sides together and sew them to form a four-square patchwork block. When you reach the center where the seams meet, you can make a small backstitch to help keep everything aligned.
You now have your first patchwork piece.
Repeat the process to make a second identical piece for the bottom of the pincushion.

The magnet is optional, but very functional!
Sewing the Sides
Now it’s time to build the sides of the pincushion.
Take your rectangles and start attaching them to the patchwork square, sewing one rectangle at a time.
Pin the first rectangle in place, sew it, and move on to the next. Continue until all four rectangles are attached.
After sewing them, iron all the seams flat.
Next, sew the short ends of the rectangles together so they form a loop. If your seam allowances were consistent, everything should line up nicely. I usually add a few extra stitches at the corners to strengthen these joints.
At this stage, your piece will look like a small fabric box.
Closing the Pincushion
Turn the piece so it is inside out, with the magnet side facing inward.
Place the top and bottom pieces right sides together, pin them, and sew around the edge.
Remember to leave a small opening so you can turn the pincushion right side out and add the filling.
Turn it inside out, pushing the corners gently so they form nicely.
Filling the Pincushion
Fill the pincushion with pillow stuffing or small fabric scraps.
Add enough filling so the needles will stick in easily, but avoid overfilling it — too much stuffing can stress the seams.
Once you're happy with the shape, close the opening with small hand stitches.
And that’s it — your patchwork pincushion is finished!
I absolutely love how these little cushions turn out. They’re practical, beautiful, and a wonderful way to give new life to fabric scraps.
I hope you find this tutorial helpful and that it inspires you to make your own pincushions for your sewing projects.
Save it on Pinterest: